The client portal can be used to give your clients real-time access to your assignments, but only revealing the information you want to.
The client portal includes a landing page, which can be fully branded by you. The candidates page shows a list of candidates on the assignment, but you can change which candidates are visible and what information about them is shown to the client.
The preview button in the top right corner will show you what a client will see when they view the portal. The three dots icon allows the client to leave the portal or to switch to another portal if they have more than one available to them.
It is now possible to create portal templates, saving users from manually recreating the same portal setup each time they create a new client portal. Client Portal Templates
There are two tutorial videos relating to the client portal:
Client Portal - this is for Ezekia users and demonstrates the features of the portal.
Client portal for clients - this is an unbranded video that can be shared with your clients and gives a brief overview of how to access and use the portal. There is an FAQ page specific to the client portal for clients here. You may share this link with clients.
Home Page
The home page is the first page a client will see when they sign in to the portal. This is an example of what the client portal home page can look like – you can use your own stock images for the background and the job description inset picture. Both the client and your firm's logos can be changed.

Using the pencil icon in the top right corner, you can set the following images.
- Background picture (the recommended image size is 1440 x 900)
- Client logo
The cog icon in the top right corner can be used to hide individual parts of the landing pages if they are not required.
The cog to the left of the 'Home' link allows you to select which pages are available to the client. You can change their order by dragging them to a different place in the list. The pin icon on this panel dictates which page will be the landing page.

You can use the pencil icon on your logo to change your logo from the standard one.
The three inset sections (Job Description, Target Companies, and Pipeline Tags) on the landing page can be hidden or revealed using the eye icon in the top corner of each section. The pencil icon on the job description allows you to change the Inset picture and the various job description fields.
The pipeline tags in the pipeline tag panel are the same as those selected to appear in the Status page pipeline tag panel.
Candidates Page
The layout of the candidates page is of a similar layout to the standard Ezekia assignment candidate list.

When a client clicks on a profile, they will now see something similar to a standard Ezekia layout profile, but possibly with sections (rather than individual fields) hidden from them.
You can adjust the card layout used for the candidate list (similar to custom cards in other parts of Ezekia), using these icons:

Candidate filters and sort orders can be adjusted by clicking the filter icon.

The gear icon in the top right corner of the candidates page allows you to choose what sections of a profile, custom fields and person tags to reveal. The ‘Full profiles/Invited’ toggle lets you switch from the standard profile list to a list of any unconnected NAL profiles that have been invited to the project.

There are some icons on the profiles (some are only visible when you hover over the profile).

- Target – the profile was added as part of a target company search.
- Eye – hides this candidate from the client.
- Cog - Choose which fields you want to hide or anonymise on this candidate.
- Speech bubble - shows comments left by you or the client. Any feedback notes left using this feature will also be visible in the Ezekia person record, under the note type 'Feedback'.
- A Custom field updateable by the client (such as Client Feedback).
- Person tags - these are hidden but can be revealed to the client.
- Attachments or forms– Pick which items on this profile should be visible to the client.
- Select – you can select multiple profiles and update their field visibility in a single operation.
The candidates page has a cog icon (shown below) that allows you to change how all profiles are displayed.

- Off limits Checkbox - if unchecked, off limits profiles are not included in the client display.
- Full view popup - if off, only the candidate cards will be visible. Clicking on a profile will not open the full profile.
- Info - this opens into a list of fields that can be hidden or anonymised. These apply to all profiles on this panel.
- Custom fields - these are hidden by default. This opens a list of your custom fields that you can then choose to reveal to the client.
- Highest Order/Recently added - if pipeline tags are displayed, this shows either the highest in the setup, or the most recent tag to be added.
- Tags - this opens to allow you to select which of your person tags are visible to the client.
Setting Custom fields to be updatable by the client
Only scoped custom fields can be set to be updated by the client. A value set on the portal is also visible in Ezekia, and vice versa. This could be particularly useful to firms that want to store comments made by clients on the person record in Ezekia - they would use a scoped custom paragraph field for this (and would hide the comments speech bubble in the custom card panel).
To set a scoped custom field, as an admin, navigate to the Person Custom Field Maintenance page. Fields that are eligible to be updateable are shown with these icons. Icon 1 indicates that it is eligible, but not updateable (the default). Icon 2 has been changed to be eligible for update by clients if it is made visible on the page. Icon 2 has been changed to be eligible for update by clients if it is made visible on the page.

To make the field visible to the client, add it to the custom card as shown below.

The field will now be visible on the custom card. If the client clicks the '+' icon, they can set the value.

Status Page
This page gives information about various aspects of the assignment. You can hide all individual sections using the eye icon in the top corner of every panel.

The top panel allows you to add your own text to describe the current status. The information in the other panels is taken from either the records related to, or the field values on, the assignment in Ezekia.
The content of the two chart panels can be amended using the icon shown.

Inviting and Managing Clients
The person icon (shown below) in the top right of the landing page and the candidates page, allows you to invite and manage your clients.

The screen below shows the list of client contact you already have. Tick those that you want to invite (1, below), then click 'Invite' (2). The client will be sent an email inviting them to the portal. When you invite someone, you are given the opportunity to amend the invitation email before it is sent.
If you need to add someone else to the list, click 'Add Contact' (3). To manage the access of those people invited, click 'Manage Invites' (4).

If you click the Manage Invites button, you will see this page. Any portals the client company has will be displayed, along with the individuals invited to each one.
- Unticking this checkbox blocks access for that person to the client portal.
- Allows you to set an end date, after which access for that person will automatically be blocked.
- Sends an email to the person advising them that you have made an update to the portal.
- Re-sends a portal invitation to a person. Invitations expire after 48 hours, in which case you will need to send another invitation to them*.
- Allows you to block or re-enable access to the entire portal.
- Allows you to set a base currency for the portal.

If the client needs to be invited to several projects, this will need to be done on an individual basis, but they will only need to set up one login to view all the assignments. Once the client is logged in it will default to the very first project they were invited to, but then they can select the three dots within the client portal landing page and then select the other projects from the list.

*Please note: The link expiry timeframe is set as part of our adherence to security standards, specifically aligned with the principles outlined in ISO/IEC 27001, the international standard for information security management. Short-lived links are a security measure designed to minimise the risk of unauthorised access. By limiting the validity period, we reduce the potential for misuse if a link is intercepted, accidentally shared, or left unattended. This approach reflects best practices under the standard, such as robust access controls, risk mitigation, and secure management of sensitive data.
Notifications
When a client leaves a comment on a profile in the client portal, by default, the assignment owner will get a notification. You can add other users that are associated to the assignment by using this process:

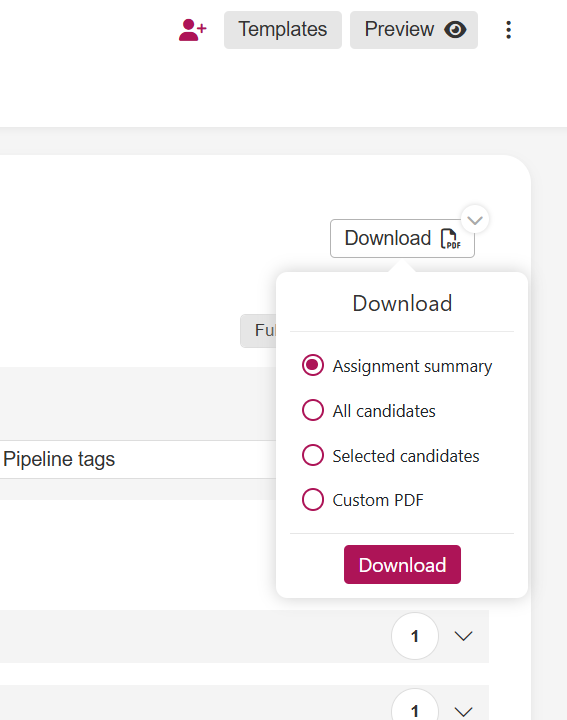
Client Portal PDF Report Download
PDF reports downloaded from the Client Portal are designed to provide an offline copy of what is presented in the portal, rather than fully customisable reports. You control which profiles are visible and which data fields appear on those profiles. When downloading, clients can choose a predefined PDF template/format (for example, Assignment Summary, All Candidates, Selected Candidates, or a Custom PDF), but the content itself is still driven by what is shown in the portal. Clients cannot create or customise report templates beyond selecting one of these PDF formats. For fully customisable reporting, Word, Excel, and PowerPoint reports are available. These can be shared directly with clients or uploaded to the Documents section of the Client Portal.